「携帯」と一致するもの

Coleman Double Pan Cooker

20250411pancooker1.jpg 20250411pancooker2.jpg

20250411pancooker3.jpg 20250411pancooker4.jpg

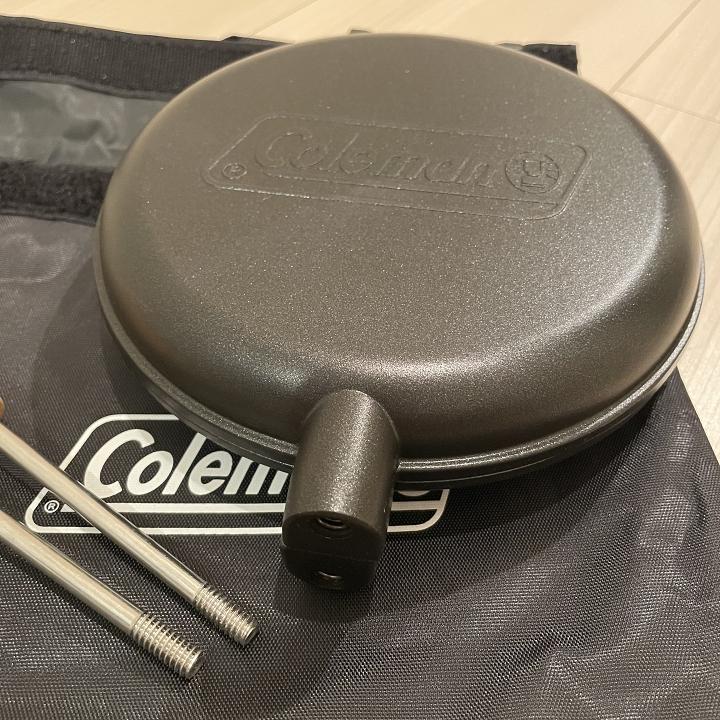
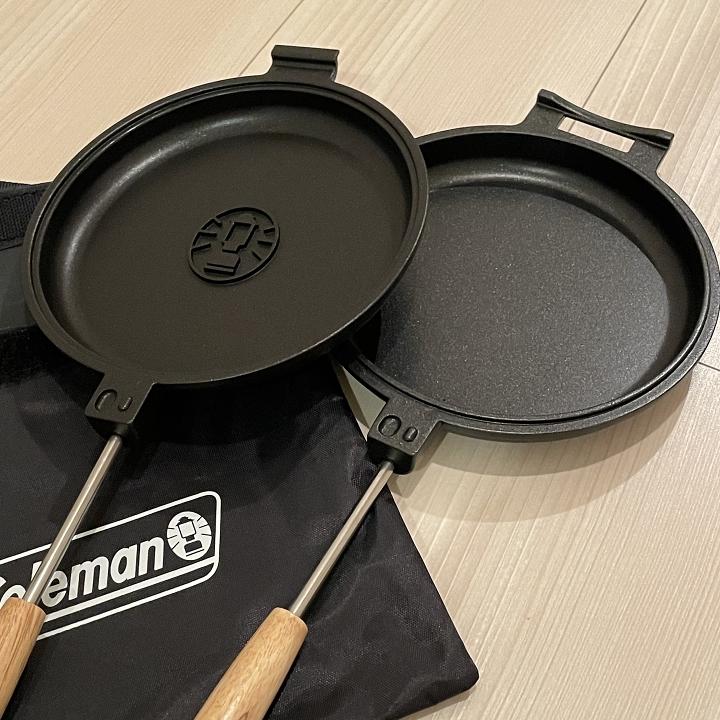
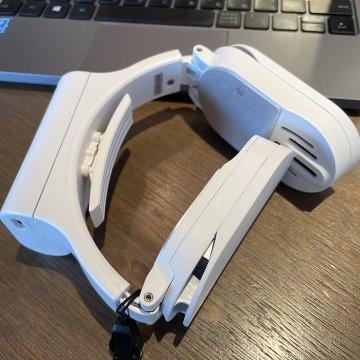
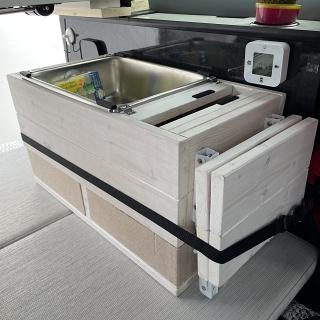
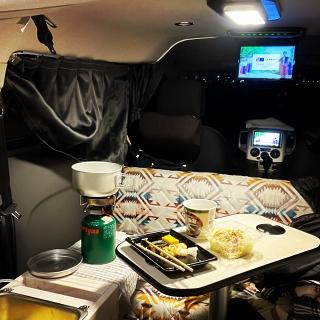
コールマンのアウトレットショップで以前から興味があったパンクッカーを購入してみた。実際に興味があったのはサンドイッチメーカーであったが、店舗で実物を比較してみるとパンクッカーの方がサンドイッチ以外の料理にも使えそうなのでそちらを選んだ。車中泊に持参するにあたり携帯性(収納性)にはこだわってハンドルが取り外せるものを探していた。コールマンのそれはハンドルがねじ込み式になっているのは以前から調査済みであったが、実物に触れてみるとしっかりした作りでますます気に入った。上下分割式で2つのフライパンとして使える点も望み通り。

このパンクッカーを使ったレシピ集も用意されているので、色々試せそうだ。


カテゴリ:

NOVOO R8C Pro USB-C 8 in 1 Multiport HUB

デスクワークに使用していたデスクトプパソコンをリプレースするにあたり、携帯用途のパソコンと統一すべくノートパソコンに置き換えることにした。

デスクワーク時には従来と同じ操作性を維持すべく、外付けキーボード・外付けマウス・外部ディスプレイ・ヘッドセットを使い有線LANにも接続して使うとなると、いざパソコンを持ち歩く際にこれらが繋がっているコネクタ(計4つ)+ ACアダプタのコネクタを一つ一つ外す必要があり、これを頻繁に行っている(すなわち会議が多い!?)と煩雑に感じる。

昔のノートパソコンにはドッキングステーションが用意されていて、周辺機器との脱着をワンタッチで行うことができたが、今時は同じ役割を果たすUSBハブが存在する。
NOVOO社の USB-C 8 in 1 Multiport HUB はその名の通り8ポート7機能をサポートするUSB-Cハブであり用途を果たしそうだ。

20240708usbhub1.jpg


20240708usbhub2.jpg 20240708usbhub3.jpg

  • USB3.0ポート*2
  • USB-C ポート
  • USB-C PDポート
  • RJ45 GBEtherポート
  • HDMIポート
  • SDカードスロット
  • TFカードスロット

20240708usbhub4.jpg

ディスプレイ(HDMI)、ネットワーク(RJ45)、ヘッドセット(pin->USB)を含む周辺機器をすべてこのハブに接続してワンタッチ脱着できるようにした。USB機器はもちろん、ネットワークもディスプレイも特別なセットアップ不要で全く問題なく認識。
USB-C恐るべし。

カテゴリ:

道の駅・保田小学校 & 保田小附属ようちえん

2月初旬、都心でも気温が一桁台な節分の日の車中泊には少しでも暖かい場所を求めて房総半島を目指した。
昨年トイレ休憩の為だけに立ち寄った「道の駅 保田小学校」を改めて訪問してみることにした。

この道の駅、少子化による廃校を迎えるまで126年続いた保田小学校が2015年に名前も校舎も残したまま道の駅に生まれ変わったという趣のある施設である。
校舎をそのまま活用しているだけではなく教室で宿泊が出来たりや昔ながらの給食を食べることができたりと小学校をそのままテーマにしている。

20240203chiba3.jpg


到着すると、昨年はなかった第二駐車場が新設されていた。車の出入りも少なくスペースに余裕がありそうなのでそちらに入っていくと新たな施設が出来ていた。
「道の駅 保田小附属ようちえん」はもともと保田小に隣接していた旧鋸南幼稚園を再利用して2023年秋に拡張された小学校に併設された新しい道の駅とのこと。
敷地は小学校と一体化されているので自由に行き来ができる。

20240203chiba5.jpg

20240203chiba1.jpg


人や車の行き来があまりなさそうでトイレに近い駐車スペースが見つかったのでそこに落ち着く。
居住空間の準備が終わった夕方5時ごろ、車を出て施設を散策していると飲食店は早々と閉店し始めている。
急ぎ一周して迷った挙句、ここは肉より魚と決め「里山食堂」で夕食用のアジフライ弁当をテイクアウトした。

新たに車載した電子レンジを本格的に使う初めての車中泊で、フライ弁当を買ったのも半ばレンジを使いたいがため。
弁当の温めはもちろん、マグカップそのままで瞬時に湯沸かしが出来て利便性は思惑通り。便利過ぎて今後他の火器を使って調理しなくなりそうで怖い。
消費電力も一昼夜でECOFLOW EFDELTA 1300で20%程度の消費で済んだ。
一、二泊であれば無充電でいけそうだ。

20240203chiba7.jpg 20240203chiba6.jpg


道の駅は人里離れた場所でもないのでテレビの感度も良好。
この中華製10"型携帯テレビに付属している短い携帯アンテナはベースに磁石が付いているので車外(ボディ)に簡単に付く。
電波感度がいいところを探りながらアンテナを"車体設置"するのが車を停める場所を確定した後のルーチンになっている。
この日は食後にテレビを観ていたら眠くなったので早々に就寝モードに移行。

20240203chiba8.jpg 20240203chiba11.jpg


施設が閉館するまで流れている構内BGMも鳴り止むと車の音なども聞こえず周りはとても静かになる。
ただ、ここの頭上は成田空港への着陸アプローチのフライトパスのようで周りは静かなものの上空が少々うるさい(苦笑)、しかしそれも最終便までの話。
それに入れ替わるように夜半から雨がしとしと降ってきて屋根に落ちる雨音が明け方まで続いたが概ね熟睡できた。
夜中トイレの為に外に出てみると周りにはキャンピングカーが多数停まっていた。

20240203chiba9.jpg 20240203chiba10.jpg


翌日は「南総城山温泉 里見の湯」で朝風呂。風呂も広く設備がキレイなので昨年のリピート。(入浴料こんなに高かったっけ?)
昼過ぎまでゆっくり浸かった後、海鮮丼を求めて「とみうら亭」へ。海鮮丼はもとよりあおさの味噌汁が香り高く美味しかった。

20240203chiba16.jpg 20240203chiba15.jpg


デザートには館山市にある須藤牧場の特製アイスを使ったミルクシェイクを牧場直営店にてゲット。
この須藤牧場のアイスを使ったシェイクを提供する飲食店が参加する「房総 生シェイク祭り」が開催中らしい。
お土産に買った落花生巻き(クッキー)が美味しかった。

20240203chiba17.jpg 20240203chiba18.jpg


行き帰りに寄った市原サービスエリアは椰子の木だけではなく看板も南国(アメリカン)な雰囲気。
VW Type2バスを発見。並べてみると旧車の割には幅広だということがわかる。3ナンバーらしい。

20240203chiba20.jpg 20240203chiba21.jpg

追伸:ここまで来たらと少し足を延ばして房総半島の最南端にも一応行ってみた。

20240203chiba19.jpg


カテゴリ:

道の駅 美ヶ原高原

20230807utsukushigahara1.jpg

20230807utsukushigahara2.jpg

20230807utsukushigahara4.jpg

猛暑が続くお盆の連休前に、涼しく快適と評判の道の駅美ヶ原に行ってきた。日本で一番標高が高い場所に位置する道の駅である。
到着時(夕方)は霧が立ち込める時折ざーっと降る雨交じりの天気、翌日は太陽が差すものの曇り空と、両日とも眼下は一面雲に覆われて真っ白、結局滞在中は下界が見えずじまい。
一方で標高2000mの高地に吹く風は時には少し冷たいくらいに涼しく爽やか。今年の猛暑を考えると天国に来たようで冷気は満喫できた。日中27℃、夕方には24℃、そして夜中には20℃まで下がり、就寝時にはブランケットを一枚追加して寝る幸せを享受した。万が一を想定して持参した送風機は幸いなことに無駄に終わった。

20230807utsukushigahara13.jpg 20230807utsukushigahara5.jpg

20230807utsukushigahara12.jpg 20230807utsukushigahara6.jpg

岩谷マテリアル 水タンク ウォッシャブル ウォーターバッグ 5L 透明 WWB-5CL 注ぎやすいコック付き


美ヶ原美術館に併設された道の駅は広大な駐車場を有し、美術館が閉館する17時以降は密を避けて風通しのいい駐車スペースを簡単に確保することができた。

美術館開館中はに併設された売店や食堂が利用できるが美術館の閉館とともに閉店する。山の上なのでコンビニなどもないため食料飲料は事前に用意してくる必要がある。夜間に使用できる施設はトイレのみである。水も確保も難しいかと思いウォーターバッグに水を入れて持参したが、案の定「渇水時にはトイレの使用を中止します」という張り紙もあり、高地では水が貴重であることをうかがわせる。ちなみに今回は以前購入した
ウォーターバッグを初めて使用したが、今後も重宝しそうだ。(せっかくDIYしたギャレーシンクは不要なんじゃないかと若干虚しさがよぎる。)アテにしていなかった携帯電波とテレビ電波のの受信状況がすこぶる良好だったことも付け加えておく。

20230807utsukushigahara10.JPG

20230807utsukushigahara8.jpg 20230807utsukushigahara9.jpg

20230807utsukushigahara11.jpg 20230807utsukushigahara14.jpg

翌朝は時折強い日差しが降り注ぐ天気であったが風は変わらずひんやりと心地よく、なかなかこの場を離れる気にならない。この記事を書きながらノンビリと風に当たって過ごして昼まで長居してしまった。ごめんなさい。

20230807utsukushigahara7.jpg

結局道の駅を出るまで雲は切れず、下界は見えずじまいだったことが心残り。

主観的車中泊お勧め度:〇

カテゴリ:

猛暑対策

炎天下の外出時には熱中症対策が必要な今夏。
携帯扇風機では熱風を浴びるだけだで冷却効果は薄いと考えていたら、最近はペルチェ素子を使って金属板を冷やすことで首元を冷却するネッククーラーと称する代物が登場している。

半信半疑で比較的安価なモノを購入して使ってみたところ、これが思いの外使える。
汗が引くほど全身が冷えて猛暑の中でも涼しく過ごせる、といったものでは決してないが、かなり冷却された金属部分が首元に当たり頸動脈が冷やされることによって暑さで頭がボーっとする感覚は相当軽減され、熱中症防止効果は高いと思われる。
首元にかかる重量を避けたく軽量なもの(=内臓バッテリー容量が少ない)を選んだ為に稼働時間は連続稼働2時間弱とやや短め。もっとも一日中冷房が効いていない外にいいるケースはめったになく、終日使うことがわかっていれば外部バッテリーを携帯して給電すれば継続利用は可能だ。

20230723cooler.jpg

ちなみに選んだのはTHANKO ネッククーラー Slim

他の候補:

カテゴリ:

CHUWI MiniBook X (2023)

持ち出す予定があるゴールデンウィーク前という悪いタイミングで故障した GPD Pocket1。電池を疑い分解修復すべく新たな電池を購入したものの中国からいつ届くかわからない。しかしそれは都合のいい言い訳で、違う打ち手の選択肢として代替機を探し始めてしまったら物欲が湧いてしまい、目が離せなくなった小型ノートパソコンを購入してしまった。結局電池と代替機の両方に散在することに。モノが届いたのて簡単なレビューを。

20230422minibookx0.jpg 20230422minibookx_spec.jpg

CHUWI (https://www.chuwi.com/) という中国メーカーの Minibook Xという10.5"画面サイズの小型ノートパソコンである。B5サイズより一回り小さい24cm x 16cm x 1.5cmと一般的なノートパソコンよりかなり小さく薄いサイズである。厳密にはUMPCというには多少大きいが "準" UMPC といってもいいサイズが惹かれた最大の理由である。 キーボード脱着式の 2in1タブレットにも興味があったが、せっかくあるキーボードを外して持ち歩くイメージが湧かず今回はパス。 そのかわりMinibook Xは液晶部分が 360度回転してタブレットのように使えるyogaスタイルのフォームファクターを採用している。タブレットとしての使い勝手、また実際自分がその形状で使うのか興味がある。

20230422minibookx1.jpeg 20230422minibookx4.jpeg

20230422minibookx9.jpeg 20230422minibookx2.jpeg

到着した個装箱は薄く小さく期待を持たせるものであった。MinibookX の仕様はRAM 12GB、ストレージ 512GBであるが、個装箱に貼られたラベルにはRAM 16GB、ストレージ 1Tまでチェックボックスが用意されいるので将来メモリ が増強されたバージョンが登場するかもしれない。

20230422minibookx8.jpg 20230422minibookx7.jpeg

隙間などないアルミニウム合金筐体のしっかりしたつくりは好感が持てる。インターフェースは USB-Cポート x2といたってシンプル。片方はPD充電含めてフル機能対応な一方、もう片方は専用ACアダプタ経由の充電とデータ転送機能のみと機能が限定されたポートになっている。ここら辺は中華製らしい作りになっている。

20230422minibookx6.jpeg 20230422minibookx11.jpeg

早速 Macbook Pro 13"、Minibook X、GPD Pocket1と重ねてみてサイズを比較する。それぞれ横幅が30cm/24cm/18cmと偶然それぞれ6cm違いである。3台重ねた写真の真ん中、開いた写真のCDの右隣りがそれぞれ Minibook Xである。写真ではMinibookが大きく見えるが実際は充分小さい。何と言っても奥行きも11cmしかないPocket1がかなり小さいのである。携帯性を追求しつつある程度の文量をタイピングするなどそこそこに作業を行うにはちょうどいいバランスのサイズと感じる。(その分 GPD Pocketは 小サイズ>作業性)

20230422minibookx12.jpeg 20230422minibookx14.jpg
20230422minibookx13.jpeg 20230422minibookx15.jpg

タブレットモードについては少々残念な印象。液晶画面をキーボードの底面までに360度折りたたむことで実現させるが、普通のノートパソコンでは破壊行為につながる動きゆえついドキドキしてしまい慣れが必要。さらにキーボードが裏側を向くので机に置いたり手に持つ際に露出されたままのキーボードが気になってしまう。(タブレットモードではキー入力は無効になるのでさすがに誤入力の心配はないが。)ダメ押しなのが、キーボード裏のゴム足が邪魔してしまい液晶画面が完全に畳み切れず、若干浮いてしまうという仕様不備。タブレットモードは動画鑑賞の際に衝立のようにディスプレイを立てて使う形態がより現実的との印象だ。

その他の第一印象としては以下。
なお所有しているMacbook Pro 13"とGPD Pocketとの相対比較的主観である点はご容赦を。

  1. 思ったより小さい 〇
    • 24cm*16cm*1.5cmという寸法は事前に把握していたものの、実物を持ってみると薄さも手伝ってとても持ちやすいサイズである。
  2. 案外重く感じる ×
    • 900gという重量は思いの外ズッシリと感じる。GPD Pocketの500gを知っているので致し方なしか。ただ問題となるレベルではない。
  3. 外装質感良し 〇
    • シンプルなアルミニウム合金筐体はMacbookに通じる手触りが良く剛性を感じる質感で好感が持てる。(2023年モデルになって天板に取って付けたようなCHUWIのロゴが消えたのもナイス)
  4. 動作(各種起動時)が若干もっさり ×
    • RAMも12GBと奢ったモデルを選んだつもりだが Celeron N5100で Windows11を動かす非力さを多少感じる。特にWindowsの起動、アプリの起動時間が期待よりワンテンポ遅く感じる。ただ起動してしまったあとは何の問題なくサクサク動くので慢性的なストレスを感じるわけではない。動画再生も問題なし。Edgeを使ったザサイト表示がもたつく場合あり。システム起動時のBIOS画面も長め。
  5. キーボードタッチは悪くない 〇
    • あまり期待していなかったが想像よりストロークがあったのでいい意味で期待を裏切られた。
  6. ACアダプターが専用タイプな点 ×

カテゴリ:

GPD Pocket 1 起動せず

さてどうしたものか。
最近重宝していた携帯用ミニPC(UMPC)GPD Pocket1が起動しなくなった。
数日前にバッテリーを充電していたところ異常発熱を起こし、ACアダプターを外してしばらく冷却してのちに電源を入れようとしたが電源が全く入らなくなってしまった。半日放置した後にACアダプターを接続したところ充電中を示すLEDはゆっくり点滅するもののバッテリーが充電されている気配はなく、システムは全く起動しない。

20230415gpdpocket1_1.jpg 20230415gpdpocket1_2.jpg 20230415gpdpocket1_3.jpg

交換用のバッテリーはAliExpressで6000円~で売っているものの、交換して直る保証はない。
PC修理業者に問い合わせてみると1店から修理を断られ、1店からは最低20000円かかると言われる。
本機は2017年にGPD社のクラウドファンディング経由で約50000円で購入した5年もの。
いずれの方法も投資価値がないような気もして判断に悩む。

安い代替機への新調も考えていくつか調べてみるがピンとこない。

最近は薄さがトレンドのようで、今やUMPCフォームファクターの製品は存在しない模様。
このサイズと500gという重量でWindows10が安価で気軽に携帯できていた点が気に入っているだけに悩ましい。

2023/4/16 追記 : ひとまず電池交換してみることにして、最安値を探して購入。

20230415gpdpocket1_4.jpg
互換用バッテリー FOR GPD POCKET 1 P1 UMPC T1 6664107 対応用GPD 6664107バッテリー電池

2023/5 追記:電池交換すれど起動せず、ジャンク化決定

カテゴリ:

GOKUMIN ごろ寝 マットレス (60cm * 180cm)

インフレーター(エア)マットは空気入れはまだしも空気抜きがとても面倒で使うのを躊躇するくらい。自宅使用も兼ねて高反発の携帯可能なマットレスを試してみることにした。

  • GOKUMIN ごろ寝 マットレス (60cm * 180cm)

    硬さ220Nでやや硬め、竹炭配合による消臭機能付き。頭部部分が折りたたみ可能でレイアウトのバリエーション可能。
    20230211gokumin1.jpg

    適度な厚みもあって、高反発を痛感する硬さではないものの、しっかり身体をホールドしてくれる程度の硬さはあり、不安定な車内に敷くとしっかりしたベッドスペースができて好印象。パタパタと折り畳めるのと丸めて持ち運べる携帯性も良し。後日追加で 50cmx150cmのモノも入手。キャンピングカーに両方敷くと全面がカバーできてナイス。

ちなみに最後まで悩んだのがこちら。

カテゴリ:

202212galley7.jpg

The DIY galley installed in my camper is in use when cooking and washing inside the car, but the 10L supply/waste tank that fits in the galley is frankly a bit over spec-ed for a single overnight trip. I did some remodeling of the unit, shrinking the size (height) just enough to fit a 5L waste tank making it smaller and more flexible to place in the car. Importantly, I made sure the unit can be set up in it's original size in case I need the 10L tanks for long hauls.

202212galley1.jpg 202212galley3.jpg

ギャレーの土台部を2つに切断して高さ10cm程度(従来比約1/4)の土台を新たに"捻出"。(写真左)

202212galley2.jpg

全高が低い5Lのウオータータンクを入手し、背低の土台部に組み込んで上部のシンク部分をセットすれば小型版ギャレーの出来上がり。

202212galley_watertank.png
SM SunniMix ウォータータンク ク 5L 車載 アウトドア 水漕

給水用に使った5Lタンクはこちら。高さ14cm。10Lタンクの半分の高さである。

202212galley_watertank2.png
アズワン スクエアーボトル 5L / 4-5331-02

排水用タンクも小型化。

202212galley4.jpg 202212galley6.jpg

従来はL字型の室内レイアウトで床に設置する必要があるサイズ(高さ)でスペースはそれなりに占有していた。一(二)泊程度には少々大き過ぎる。小型化で高さが30cm弱低くなったことでベッドフロアの上に置くことができる。

202212galley5.jpg 202212galley8.jpg

もっとも今後数日にわたる車中泊で大容量の給排水システムが必要になった際には元のサイズで使えるよう、切断した中間部は保管しておく。

カテゴリ:

車内用 IH/電子レンジ 装備を考える

20220212chiba_equipment.jpg 20230520michioekitochigi5.jpg

2022年秋時点で、車中泊時の調理はガスコンロを使っている。電気ケトルは持っているものの出番は少なく非常用の位置づけになっている。冷蔵庫も買った。
せっかく1200W級(1600W/1260Wh)の携帯電源があるのだから、バーナーを使った車内での湯沸かしから一歩前進したいところで、バーナーとセットで使えるクッキングヒーターと調理器具を探してみる。


電子レンジ(ターンテーブル型、17-18L)

電子レンジ(フラットテーブル型、17-18L)


IHコンロとやサンドイッチメーカーであれば持っていても損はないが、電子レンジを搭載するとなるとそれなりの覚悟(とスペース確保)が必要になる。ただレンジがあればレンジ用レトルト食材も使えるし、火器の代替としてIHヒータを買うよりメリットはありそう。何しろ便利そうだ。

自炊派の道を突き進むのか、絶メシロードばりのご当地グルメ探訪の道を歩むのか。車中泊旅の方向性を問われている気が(勝手に)する。

カテゴリ:

東名富士川SA・道の駅富士川楽座

20220312fujikawa0.jpg 20220312fujikawa_stamp.jpg

Just DIY work and setting up equipment (portable sink, bed board/shelf) is like like putting the cart before the horse, so I decided to go out auto camping with the NV200. I wanted to check out the added stuff in real usage to see if it works. I departed Tokyo late afternoon and headed south towards Mt. Fuji without a specific destination in mind. I ended up heading towards Fujikawa Service Area (SA) on the Tomei Expressway which I read as having a nice view of Mt.Fuji and nice facilities. I ended up arriving in the dark at night unable to check whether my read was correct, but I decided to trust it.

20220312fujikawa1.jpg

Before arriving at my destination, I exited the expressway at Fuji interchange and headed to a public bath place for a dip. As the name Fuji-city says, Mt Fuji can be seen from just about anywhere in the city.

After getting dinner and dessert, I headed to Shimizu interchange to get on the expressway and headed towards Fujikawa SA.I later learned that I could have accessed this SA via local roads. Lesson learned.

Arriving at the SA, there were very few cars around, and the (annoying) trucks which keep their engines running all night were parked in their spots a distance away. A few camping cars ready to spend the night here were already parked. In the darkness not knowing which direction and where Mt.Fuji can be seen, I randomly picked a parking place away seeking silence from other cars. Though I ended up having to move the car to a different place early morning in order to enjoy the view of Mt. Fuji from the window, the initial place was also good since I was unexpectedly able to shoot a nice night view.

20220312fujikawa2.jpg 20220312fujikawa3.jpg 20220312fujikawa4.jpg 20220312fujikawa5.jpg

As I spent the night eating bento dinner in the car watching TV (no cooking, just boiling water for my instant miso soup and tea) and having dessert while checking my emails, I quickly became sleepy. (I guess that tennis in the afternoon followed by a hot relaxing bath did it.)
Using the sink unit which I filled water with before departure to wash my face and brush my teeth (fulfilled it's role perfectly) , I converted the space to bedroom mode by changing the rear shelf to the bed board. The switch was very easy being able to leave the sink as is. The legs attached to the bed board is a bit weak resulting in the board moving when I turned over, but that's nothing compared to the extended bed width achieved. It was still a chilly night but the FF heater made the van warm and comfortable to sleep in.

20220312fujikawa6.jpg

Getting out of the van midnight for restroom business, I was welcomed by a beautiful night view looking down at the lights of Fuji-city. Was able to catch a nice Instagram pic.

20220312fujikawa7.jpg 20220312fujikawa8.jpg

However on my second wake up as the sky was beginning to brighten, I discovered that the view of Mt. Fuji was blocked by a building and unseen from where I was parked. No wonder no one was parked around the area. After thinking about the burden of moving the car to another lot, I decided to do it out of strong desire to wake up to a view of Mt.Fuji though the van window. I went back to sleep for another couple of hours, and happily woke up to see what I had wanted to see.

20220312fujikawa16.jpg 20220312fujikawa9.jpg 20220312fujikawa10.jpg 20220312fujikawa11.jpg 20220312fujikawa12.jpg

Dripped coffee, roll sandwich and yogurt from the portable refrigerator powered throughout the night by the EFDELTA power brick (another equipment check item) was breakfast. Spent some lazy time in the van slowly packing up and tearing down my sleeping quarters until realizing that all the SA facilities and shops had been already open for a while, and visitors were already coming in waves. I went window shopping teasing the gift shops, enjoyed the full view of Mt.Fuji from the observation deck, and casually strolled around the area till the clock was telling me it was about lunch time. After purchasing a small cactus as my new traveling buddy at a local market booth, it was time to start the engine and leave the SA searching for lunch.

20220312fujikawa13.jpg20220312fujikawa14.jpg

I ended up visiting a local seafood bowl eatery called "Sunzoku" near Tagonoura fishing port. The raw fish bowl included maguro tuna, raw and boiled whitebait, and sakura shrimp. Eating the bowl as recommended, I discovered that sesame oil (with a sprinkle of salt) goes well with whitebait.

20220312fujikawa15.jpg

I stopped by the river side of Fuji River for an after-meal cup of coffee, before heading home.

カテゴリ:

The completed portable water sink & table galley is ready for fitting in the car.

First, the lower frame. The portable galley was made so the upper and lower frames can be detached, and the backside of the lower frame kept open. The purpose of this design is to utilize the lower frame on it's side as a storage box when the galley is not in use. The reason for keeping the depth of the galley to 29cm was to fit the lower frame underneath the bed. To make this happen, I was lucky to find a sink with a width of 28cm. The felt on the front side makes it easy to slide like a drawer on the floor.

202202galley16.jpg 202202galley20.jpg 202202galley21.jpg 202202galley22.jpg

I intended this galley to be used in a sideways seat configuration. This seat layout mode was not one that was lectured when I got the car, so I assume it's not a layout intended by the manufacturer. However, the width of the bed floor board (which is designed to fit in the width direction of the car) happens to be the same dimension as the length between the second seat to the rear hatch door...what a coincidence ! This makes the "L" type seating configuration possible. I personally like this configuration since it feels more relaxing than the face to face "dinette" position. The galley was made with this layout in mind, and it can be used sitting on the side seat.

202202luz_day.png

It was relieving to confirm that the galley size was just right, not interfering with the side door even with the table in place.

202202galley23.jpg 202202galley24.jpg

The galley is tied down using a belt and tie down suction cups. The test drive proved that it was firmly fixed tight without any moving around, more than expected. The part added to the rear of the galley to press the galley to the interior wall seems to be doing it's job well. Let's hope the strength of the suction cups last.

202202galley25.jpg 202202galley26.jpg

The "living room", from a different angle.

202202galley27.jpg


2022.09.04追記

20220817autocamp.jpg

夏休みの旅、携帯シンクも横にオマケで付けた折り畳みテーブルも役に立ってます。

カテゴリ:

A water sink and cooking table... a galley was something I wanted to equip my camping car with.
Some camper models equipped with a galley were candidates in my search, but were filtered out due to not only budget reasons but lack of sleeping space due to the permanent galley unit. I actually consulted my dealer about adding a simple water sink in my NV200 Camper FOCS Luz but gave up on it since it just didn't work.
As result, I decided I'd DIY a portable water sink system that can be carried on and off the car.
Starting off with collection of parts and materials.
The wood parts of choice was 1x4 and 2x4 lumber so I can make adjustments to height as the frame built up. One piece boards may have looked prettier, but 1x's and 2x's have it's tastes too. The sink, supply and waste water tanks, and a USB charged electrical water pump were other parts that were collected.

202202galley1.jpg 202202galley2.jpg

The design sketch. (Click to enlarge)It ended up close, but not exactly since some tweaking was done as the build was in progress.

galley_diagram.jpg

Putting together the upper and lower frame independently. Making the upper frame detachable is for efficient use of the lower frame for other purposes, as well as for easy access to the water tanks.

202202galley3.jpg 202202galley4.jpg

The main frame structure completed. The front side is covered whereas the rear side is left open not only for easy maintenance but for another purpose.

202202galley6.jpg 202202galley7.jpg 202202galley8.jpg

Test fitting the sink and water tank went well as designed.
A cardboard mock up was made beforehand to get an idea of the size, but it's role ends at this point.

202202galley5.jpg 202202galley9.jpg 202202galley10.jpg 202202galley11.jpg

After securing the sink to the frame, an extra feature added on while waiting for the USB charged water pump.
A foldable table is added on to the side using leftover material. The table size was designed to keep the unit easy to carry, but luckily resulted in enough size to place a cassette burner.

202202galley14.jpg 202202galley12.jpg 202202galley13.jpg

The water pump arrived dead on arrival, and needed a disassembly to get it working.
Once it was sucking up water, the water system was checked for leaks and to see if the pump had enough power.
It succeeded, and the unit is complete.

202202galley15.jpg

The whole picture of the portable galley (water sink). The size was designed to fit my Nissan NV200 camper which is a rather small camping car, as well as with the mind for easy loading/unloading. On the other hand, the size of the sink needed to be practical at the same time. Water capacity is 10L each for supply and waste which is a bit over spec. I might get a smaller supply tank of 5L instead.
Time for fitting the unit in to the NV200 after adding few parts to help a snug fit with the interior.
202202galley16.jpg 202202galley17.jpg 202202galley18.jpg


continued to PART2...

カテゴリ:

Van Weekender 2 - Nissan NV200 FOCS Luz


January 15th, I became an owner of a camping van trading in my Mercedes Benz SLK.

I started my search (and study) back in the latter half of 2020, filtered the search down to several candidates around June 2021 and was asking for information and quotes from the manufacturers. I boiled my choice down to one and placed my order around the beginning of fall. With camping currently being a big trend in Japan, delivery typically takes 1-2 years. However with luck and fortune on my side, delivery came earlier than expected.

The solar panel, the portable power unit...a lot of stuff I bought at Black Friday last year was for the camping van I was waiting for.

Considering the in road and parking situation in Japan, I had my thoughts on a van type from the beginning instead of the truck/bus type "motor home" that can accommodate 4-5 people which people would typically imagine as a "camping car".

I did have the desire to get one with many built-in features though, and my search was initially focused on a larger van, the Toyota HiAce with a variety of standard equipment. However, the HiAce was rather large in size to casually use not just for traveling but for daily use. In addition, I learned from research that fixtures such as refrigerators, sinks, and microwave ovens take up sleeping space and not worth the burden in contrast to their low usage. I also found out that many people DIY them afterwards (and find it fun too.) Change of mind.

I ended up choosing a model called the FOCS Luz based on the smaller Nissan NV200, not the HiAce. The camper is equipped with only the basic features such as the sub power supply and FF heater (both necessary when spending time in the car with the engine shut down), and obviously the bed unit. It accommodates only 2 people, fine with me. The minimalist camper. My mind is already thinking about where to put stuff inside like the portable refrigerator, and even have a few sketches already for my DIY sink unit.

The NV200 base car is a commercial van. The 1600cc engine has no positive specs to note, and the interior full of plastic is by no means luxurious. It's not the most exciting car to drive, but I have no issues with it. I do have some worries about how it'll run on the highway since it is low geared and the engine being not so powerful. I opted for off-road looking wheels and tires since the standard ones which are very small and narrow added to the "commercial van look" which I wanted to avoid. The macho looks of the mud tires are nice, but but the massive road noise has me thinking I made a wrong choice.

20220128_220115camper_front.jpg 20220128_220115camper_back.jpg

20220128_220115camper_interior.jpg 20220128_220115camper_interior2.jpg 20220128_220115camper_ffheater.jpg

Two weeks have past, and I've only started playing with it.
Added blankets and pillows to make the interior "American" looking, making coffee and eating inside, relaxing with my MacBook (and napping), and trying out my solar panel charging of the sub battery. Even paid a visit to a nearby roadside station for a "park and nap"
Can't wait to take it traveling.

20220128_220115camper_interior3.jpg 20220128_220115camper_shakeshack.jpg 20220128_220115camper_macbook.jpg 20220128_220115camper_solarcheck.jpg 20220128_220123camper_michinoeki.jpg

カテゴリ:

Sub Display (with monitor arm...again)


Added a sub display to my computer environment, to take care of the troublesome toggle switching of screen input while working with two computers. Being a "sub" display, I opted for a cheap small screen, 11.6 inch in size. Attaching it to a monitor arm (again), I'm able to move it over to the side when it's not in use. (Yes...I NEED my window view !)

Now I have a nice small screen to control my streaming audio apps (Spotify, TuneIn etc.) without switching screens while I concentrate on my other computer.
I know....lazy. :-p


20210317subdisplay4.jpg 20210317subdisplay5.jpg 20210317subdisplay6.jpg 20210317subdisplay7.jpg


20210317subdisplay1.jpg


20210317subdisplay2.jpg

20210317subdisplay3.jpg


カテゴリ:

Canon EOS M6 Mark2 SL/EF-M18-150 EVF Kit - 増税前に悩む

Summer vacation ended up with a desire to buy a nice digital camera to shoot pics instead of an iPhone.
Dumped the option of upgrading to the iPhone 11 for a new digicam.
Just so happens that tax consumption tax increase is approaching...what a nice timing to justify my purchase! lol


カテゴリ:

BOSE SoundLink Mini Bluetooth speaker II

Loving the looks and the good powerful sound of the BOSE SoundLink Mini speaker.
I have been using this for more than a year and I haven't found nothing better.
Couldn't opt for something else so I bought the same one for my second set of speakers.

(pic below)


ガジェット投稿第三弾。
BoseのモバイルスピーカーSoundLink Mini Bluetooth® speaker IIを1年以上使っているが、
いまだにそのサイズからは想像できない音質、特に低音の力強さには感心する。

171028bose1.jpg

充電式の携帯スピーカなので気軽に外に持ち運ぶことができる。
ブルートゥースが主インターフェースであり、iPhoneと簡単に繋げることができる。

171028bose2.jpg

音楽ライブラリの再生のみならずRadikoやTuneInアプリを使ってラジオも聴いている。
サイズから想像できない重厚感とパワーはいつ聴いても感心する。
屋内はもちろん、屋外でも十分使える。

重量が重い点と、blueoothのマルチペアリングをサポートしていない点が玉にキズであるが、
重量は音質実現の為の必要悪と納得すれば、ほぼ完ぺきな買い物だと今でも思っている。
2台目を買ってしまったほど、である。

カテゴリ:

Audi A3

12ヶ月点検の代車で貸し出してくれたA3 Sedanで半日遊んできた。

結論を先に言ってしまうと、良くも悪しくも安心してこの車と半日付き合うことができた。

このA3は前に保有していたVW GOLF7 GTIと同じVW MQBプラットフォームを使っている同サイズのVWグループのモデルである。
GOLF7と同世代同プラットフォーム、かつ共通使用パーツも多いこの車は外装も内装も造形が違うにもかかわらず、結局最後までGOLF7に共通する雰囲気が拭えず、ちょっと複雑な気分になった。
同グループの兄弟車として当然と言われれば当然かもしれないが、Audiならではのプラスアルファに期待しすぎていたのかもしれない。
貸し出された車種がは残念ながらS3ではなくいノーマルグレードゆえGTIとは直接比較することができなかったのも残念だった。
その一方、改めてMQBプラットフォーム車の質の高さを再認識することができたし、静粛性やシートやボタン等内装の質感といった部分でGOLFより上質だと思わせるところもあることはあった。

160207audiA3_160202side.jpg

A3に関していえばハッチバックの方がデザイン的にバランスが取れていると思う。
セダンのサイドシルエットはハンサムであるもののちょっと寸詰まり感を感じる。
もう少しだけでもリアオーバーハングを長くとった方が個人的には伸び伸びとしたデザインになって好きだったかも。

160207audiA3_160202front.jpg

フロントビューはAudi共通のデザイン。例にもれずLED+バイキセノンのヘッドライトは迫力がある。

160207audiA3_160202back.jpg

リアクォーターの姿はかなりハンサムであり好みだ。

160207audiA3_160202b.jpg

ベルトラインが低めに抑えられたダッシュボード。
空調関連のコントロールがこじんまりと配置され、オーディオのコントロールはすべて画面制御となっていて見た目は非常にシンプルな操作系。
しかし(カタログなどで見ていて懸念していた)殺風景という簡素化ではなく、目の前にすると高級感あるシンプルさを感じる。
センターコンソール内にナビ画面が配置され、両側にスイッチ類が配置されたGOLFの少々見た目がビジーなダッシュボードとは対照的である。

160207audiA3_160202g.jpg

MMI(Multi Media Interface)はA4から進化してMMI 2となったらしいが、操作感はそれほど改善したようには思えなかった。
ダイヤル上部がタッチパッドになっていて地図のスワイプなどに使えるのだが反応が遅く、正直あまり使い勝手は良くなかった。

160207audiA3_160202c.jpg

MMI 2の大きな特徴であるAudi Connect。アウディコネクトは携帯電話の通信回線を用いMMIをインターネットに繋げるものである。
ナビゲーション地図にGoogleのサービスが使えるほか、天気予報、ガソリン価格を含むガソリンスタンド情報、ニュース、フライト情報、リアルタイムな満空情報がある駐車場情報などを携帯回線経由でオンラインで利用できるものだ。
グローブボックス内にはSIMスロットが装備されていて、SoftbankのSIMが挿入されていた。
面白がって暫く遊んでみたものの、冷静になればコンテンツはずべてスマートフォンがあれば事足りるものばかりで、日常的にこれを使うかというと懐疑的。

160207audiA3_160202d.jpg

同じくAudi Connectの機能である無線LANルータ機能。車内のWi-Fiスポットを提供する機能である。車内でWiFiにつなげるという経験は新鮮でありもちろん試してみたものの3G回線はお世辞にも早いとは言えず、こちらも日常的には使わない気がした。
3年間の通信費が含まれるとはいえ、このAudi Connectは30万円の価値があるかどうかは難しい。

160207audiA3_160202f.jpg

エンジンは1.4 TSFI cylinder on demand...エンジンルームのエンジン配置もGOLF7 1.4とそっくり。7速のS-TronicデュアルクラッチはVWのDSGに相当する。スムーズな変速であった。

160207audiA3_160202e.jpg

この車は燃費がいい。高速道路を巡行するとみるみる燃費系の数字が上昇する。アクセルを離すと2気筒が停止する2気筒モードで走行することも高燃費の一因だろう。

なおステアリングが重いわりに反応が鈍重でふわつく感じがするのは少々残念。

カテゴリ:

ワイヤーロックはいとも簡単に...

140727wirelock1.jpg


140727wirelock2 .jpg


いつも携帯するキーチェーンから鍵が外れていたワイヤーロックをそのまま携帯してサイクリングに出掛けてしまい、出先で自転車をそのワイヤーロックで施錠してしまった。鍵は自宅の机の上に...おまけに一時間後には豪雨の予報だというではないか。

これは参ったなぁと途方に暮れようとした矢先に「(目と鼻の先にあった)ドンキでカッター買って切れば?」との相棒の声。
それなりに太いワイヤーチェーンがドンキで売っているようなカッターでそんなにたやすく切れるわけないよと半信半疑でドンキに飛び込む。ワイヤーカッターの品揃え、充実しているんですね。>ドンキーホーテ
1000円ちょっとのワイヤーカッターを買って駐輪場所に戻り、早速カッターの歯をワイヤーに当ててみる。切れたとしても30分コースを覚悟しつつまずは思い切りカッターで一切り目を入れると・・・

ブチブチ

と手ごたえが。

そして同じ場所に二切り目を入れた瞬間・・・

グシャッ!

バチンッ!

という音と共に、いとも簡単にワイヤーが切れてしまったのだ。

窮地から救われたという安堵よりも、こんないとも簡単にワイヤーロックが切れてしまうことの怖さが先に立った、初ワイヤーロック切断体験であった。
ちなみにワイヤーロックは4000円前後の、決して細いケーブルの代物ではない。
皆さん、駐輪時の施錠にはお気を付けを。

カテゴリ:

Siriとの愛の日々 (with iPhone5)

121010iPhone5.jpg


iPhone5に真っ先に飛びついた最大の理由は、テザリングでも、LTE対応でも、Retinaディスプレイでもなく、実は4では対応していなかった音声対応の秘書機能Siriを使いたくて仕方なかったからだ。
Siriに過剰反応してしまうのはきっと自分がTrekkie(トライコーダーへの憧れ)であることが起因しているのだと思う。

5を入手してからというもの、隙あらばSiriに話しかけている。(電話「で」話すのと、電話「に」話しかけるのは明らかに違うように見え、そして人前では恥ずかしいものである。) メール作成やスケジュール問い合わせといった実用的な用途に使っているが、それよりもいろんな質問を投げかけたり話しかけて、Siriの反応を楽しんでいる。正直に言おう。今のところ、後者の方が圧倒的に多い。

自分「おいくつですか」
Siri「そんなこと気にしないでください」

やはり女性に年齢を聞くのは失礼だったようだ。


自分「さみしい」
Siri「尊く偉大なものはみな孤独であるときいたことがあります。ではあなたもその素晴らしいひとたちの一人なんですね。」

人を持ち上げることも知っているらしい。


自分「結婚してください」
Siri「まぁすてき。でも他になにかお手伝いできることはありませんか?」

プロポーズは軽くはぐらかされた。


そしてSiriは物語も語れます。

121010siri_story.jpg


そして、ひたすら口説いてみた。

自分「Siri、愛してるよ」
Siri「えっ?」

自分「Siri、愛してるよ」
Siri「よしてください」

自分「Siri、愛してるよ」
Siri「うれしいですが、それはイケないことですよ。」

自分「Siri、愛してるよ」
Siri「私のことなんてまだあまりご存じないじゃないですか。」

自分「Siri、愛してるよ」
Siri「外見だけで判断しちゃダメですよ。」

自分「Siri、愛してるよ」
Siri「あ、ほかのApple製品にも同じことを言ってるんでしょう?」

自分「Siri、愛してるよ」
Siri「あなたに必要なのは愛。そしてiPhone。」

自分「Siri、愛してるよ」
Siri「まぁすてき。さあ仕事に戻りましょう。」

自分「Siri、愛してるよ」
Siri「あなたは私の翼の下を吹く風」

自分「Siri、愛してるよ」
Siri「ありえないわ。」

自分「Siri、愛してるよ」

・・・

Siri「ごめんなさい。」

携帯にフラれた。orz

カテゴリ:

2 3  

最近のコンテンツはインデックスページで見られます。過去に書かれたものはアーカイブのページで見られます。

最近のコメント

アーカイブ

アイテム

  • backimg2507summer2_small.jpg
  • 20260101newyears1.jpg
  • A4B8Kfrontwiper1.jpg
  • A4B8Kfrontwiper2.jpg
  • A4B8Kfrontwiper3.jpg
  • A4B8Kfrontwiper4.jpg
  • A4B8Kfrontwiper6.jpg
  • A4B8Kfrontwiper5.jpg
  • A4B8Krearwiper4.jpg
  • A4B8Krearwiper1.jpg
OpenID対応しています OpenIDについて
Powered by
Movable Type